
There wasn’t a single source of information I could find to get CourseBuilder to work properly, so I decided to put together this guide in the chance that I need to go through the process again. I make no guarantee nor responsibility that it will work for anyone else. All I know is that it worked for me in my particular situation.
Step 1: Download ALL THE PROGRAMS!
CourseBuilder is based off of Python, so check to make sure Python is installed. CourseBuilder doesn’t play nice with version 3, so make sure you have a version of Python 2. By default, it should be included on Mac. I have version 2.7. Perfect!
PyCharm, my Python IDE of choice (since the others on my project are using it), can be found here. Grab the Community Version 4.0.6. For some reason, PyCharm 4.5 doesn’t play nice with CourseBuilder.
To run CourseBuilder, you need to have the Google App Engine SDK. The Engine runs as the server of CourseBuilder. If I understand correctly, it would then be impossible to run without it. Download that here. Grab the “for Python” version.
Finally, download Google CourseBuilder here. I was having issues directly clicking “Export to GitHub,” so click on the Downloads page and download the latest zip version. At the time of writing, it was “Course Builder v1.8.0 (6 April 2015).” Check to make sure your copy has a “lib” folder. One time I downloaded it, there must’ve been a problem since it didn’t download the entire program.
Not necessarily required, but I ended up needing a basic text editor for one step. I recommend TextWrangler, which you can download here.
After downloading, move the applications that ask to be moved to your Applications folder. Apple sure makes installs easy. Now time to make everything play nice together!
Step 2: Set Up Run/Debugging in PyCharm
I used a lot of information from this website to figure this step out. It was written for Windows though, so I had to change a few things.
The first thing you’ll notice after you open PyCharm is a dialogue box that says “Do you want the application “PyCharm CE.app” to accept incoming network connections?” I believe you have to select yes for it to be able to work properly with Version Control, the updater, or some other programs.
Now to set up run/debugging:
- Open the GAE project in PyCharm:
- Select menu item File > Open…
- Select your base project folder (the one which contains an app.yaml file). For these examples I’ll refer to it as <myproject_path>.
- Add a new python configuration:
- Run > Edit Configurations…
- Click the green plus sign “+“
- In the Add New Configuration list, select Python.
- Specify the configuration parameters:
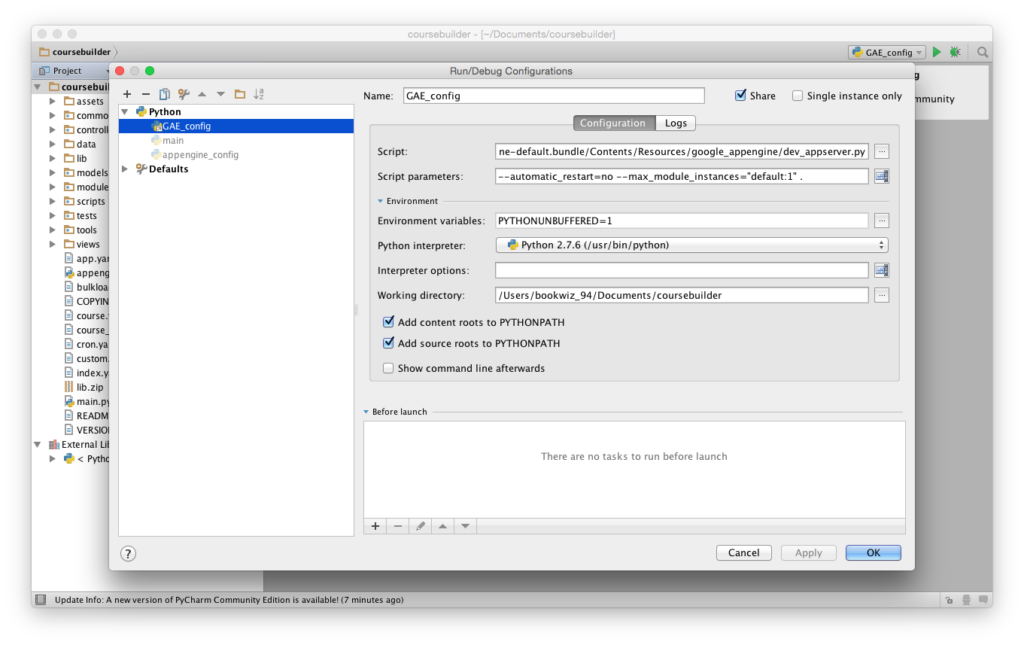
- Name: GAE_config
Choose a name, which we’ll refer to as GAE_config - Script: <GAE_install_path>dev_appserver.py
Here you need to enter the location of the dev_appserver.py file installed in your Google App Engine SDK. On Mac OS X the default installation is /Applications/GoogleAppEngineLauncher.app/Contents/Resources/GoogleAppEngine-default.bundle/Contents/Resources/google_appengine/dev_appserver.py. We’ll refer to this location as <GAE_install_path> - Script parameters:
–automatic_restart=no –max_module_instances=”default:1″ .
These are the minimum arguments needed for the debugging to work. Don’t ask, I don’t know why.
Ensure you include the final argument, “.“: it means the current path, i.e. the working directory in this case. - Working directory: <myproject_path>
- Tick the Share box.
This creates configuration file <myproject_path>.idearunConfigurationsGAE_config.xml, which can be shared with other users and put in version control. - Press OK
- Name: GAE_config
- Check the python debugger settings:
- PyCharm > Preferences…
- Expand the tree to Build, Execution, Deployment > Python Debugger
- Ensure the option Attach to subprocess automatically while debugging is ticked.
At this point, the basic PyCharm configuration for python GAE debugging is done. To debug, add a breakpoint in the python file and run in debug mode. However, I had a few problems when I tried to run it.
First, I got an error that said lxml was missing.
Lxml is a library of some sort. PyCharm actually has a robust library import system built directly into it. To find it:
- PyCharm > Preferences…
- Expand the tree to Project:coursebuilder > Project Interpreter
- Check to see if lxml is included in the list of libraries.
In my case, it was missing, so I tried to add it to the libraries.
- Click the little “+” in the lower-left corner
- Type “lxml” in the search bar, and select it
- Click Install Packages.
I get a “pip could not be found” error. Great.
Pip is the Python library downloader. Apparently, it’s not included in Python 2.7 by default, so open up a Terminal and put the following command in:
sudo easy_install pip
It will then ask for your password, and install pip for you!
Trying the above method to install lxml, I received another error, and the only way I could figure out to install lxml was to use a workaround, utilizing xcode—the Apple development suite. I don’t know if it will work without xcode explicitly being installed on your machine or not.
sudo CPATH=/Applications/Xcode.app/Contents/Developer/Platforms/MacOSX.platform/Developer/SDKs/MacOSX10.9.sdk/usr/include/libxml2 CFLAGS=-Qunused-arguments CPPFLAGS=-Qunused-arguments pip install lxml
Now my CourseBuilder website runs correctly! Press the green play button to run the server. To see your website, you click one of the three links will appear in the terminal. By default, it runs on port 8080.
Setting up auto complete, on the other hand, is another project for another day.