Tag: programming

Embed Unity3D Games in a WordPress Page with Shortcodes

If you’ve added Unity3d games using the iframe trick I talked about in my Embed Unity3d Games in a WordPress Page article, you may have come to realize, as I did, that it doesn’t work that great when the game is not fully self-enclosed (i.e. you want there to be some interaction between your game and some outside resource, such as a server-side high score table).

Granted, if your game is fully enclosed and doesn’t communicate with anything outside of the game at all, the iframe method works just fine. But you may still want to follow along here anyway, because this method is a little bit easier to use once its all set up properly.

Note that unlike that previous post though, this method requires you to have a hosted version of WordPress and have access to view and modify the PHP files that power your site. I’m sure this method could be turned into a plugin (and probably would actually work better that way, as really this is plugin-style functionality and would only require access to install plugins), or even a custom Gutenberg block. But I didn’t think of that until I had already finished, and I have zero experience developing WordPress plugins or custom Gutenberg blocks, so this is the way I did it! 😉

Why Not Just IFrame It?

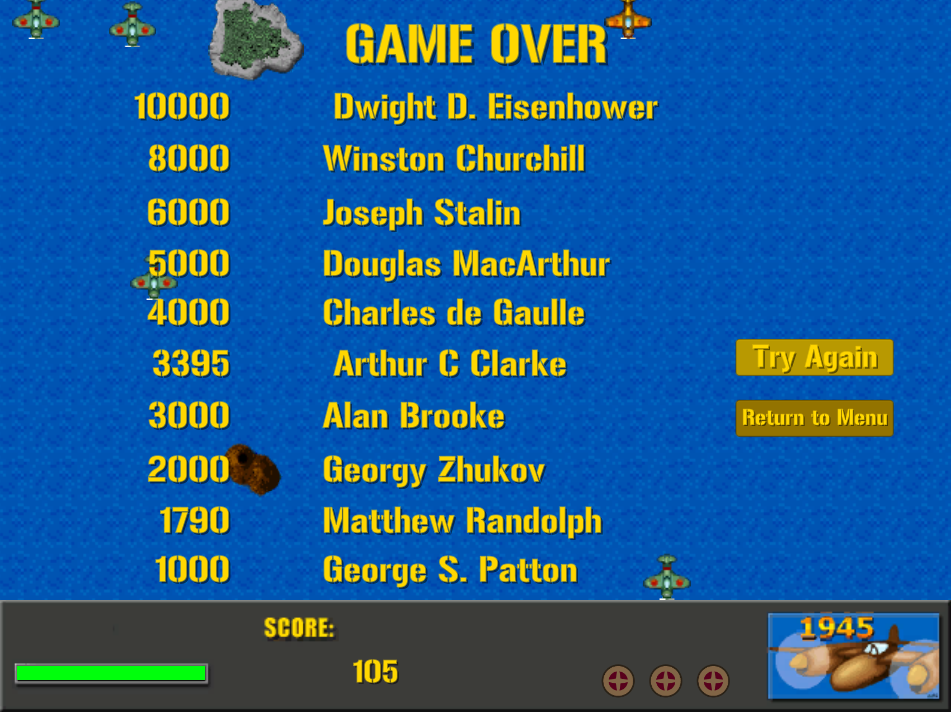
The reason the iframe trick doesn’t work that great when the program is not self enclosed is due to the Same Origin Policy. As I was updating my 1945 game to include a global high scores table, I was getting an error in my browser console saying “Cross-Origin Request Blocked: The Same Origin Policy disallows reading the remote resource at $somesite.” This indicates that the request was blocked due to violating the CORS security rules.

SOP states that one webpage can request resources from another only if both webpages have the same origin, which is defined as having the same scheme, host, and port. As I looked into why that was happening (my game is requesting a resource located on the same server, using the standard http:// port of 80), it seemed odd that the request was blocked. My best guess is that it is a limitation baked into using the <iframe> tag.

I tested out trying to fix it by adding a crossdomain.xml file, but it didn’t seem to help (i.e. it was still throwing the error for me) but I suppose its worth a shot. This is a sample crossdomain file I found on the web:

<!--?xmlversion="1.0"?-->
<cross-domain-policy>
<allow-access-fromdomain="*">
</allow-access-fromdomain="*">
</cross-domain-policy>

For what its worth, I’ve heard that using the “*” wildcard isn’t great for security purposes, so if this does work you will want to tweak it to allow access specifically from your website.

Returning from our tangent, assuming we want our games to be able to communicate with an outside resource, we need another solution for embedding our games into our WordPress websites… and shortcodes will come to the rescue!

Preparations

First off, while this process can be done using any theme, if you use a published theme such as the Twenty-Twenty theme or something else, if/when you update the theme it might erase some of your work as we are going to be directly modifying some of the theme files. Thus, to preserve your hard work I recommend you make a child theme before starting to code. I won’t go into that since there are plenty of other great tutorials on making child themes.

Create the Shortcode

To create the shortcode, we need to dig into some PHP code. WordPress was written using PHP and we’re going to hook into the existing code in order to add our additional functionality.

Where we are going to hook into the code is in the “functions.php” page in your active theme. Look for the following file, substituting the name of your active theme for [your-theme-name]:

/wp-content/themes/[your-theme-name]/functions.php

You technically could write all your extra functionality directly in this file, but I prefer keeping my custom code separate. So I created a new PHP file in the same directory and called it “custom-functions.php”.

Because WordPress doesn’t know it should use the code from our new PHP page though, we have to tell it to read our new file! At the bottom of the functions.php page, add the following line of code to tell WordPress that we have extra functions that we also want to use:

include('custom-functions.php');

This will tell WordPress to load our new functions when it reaches that line of code. Next, switch over to your new custom-functions.php file. This is the real meat of our project (or mashed potatoes, for our meat-averse friends).

custom-functions.php

Side note: If you’re familiar with PHP and want to skip my line-by-line explanations (or you don’t really want to be a web developer and just want to copy-paste the code), the full code is at the bottom of this section.

In this section, we’re going to use several WordPress functions. If you’re more curious about a function beyond my brief explanation here, all of the function are described in fuller detail within the WordPress Code Reference, and I recommend you check them out there. The Code Reference is an invaluable resource, in much the same way that the Unity Scripting Reference is for programming Unity games!

PHP files always start and end with the following syntax, so lets start by putting these into our new, blank file:

<?php

?>

Inside of those lines goes all the rest of our code we are adding. Most of our code will go in a function, which is fundamentally the same thing as a method in C#, although with slightly different syntax. So lets create our function:

function unity3d_embed_webgl_function( $atts = array() ) {

}

The keyword “function” tells PHP that you have a function (go figure!), followed by the name of your function, the arguments in parentheses, and then the curly braces that designate the function block. Woah, that argument list looks kinda weird! What it’s saying is we don’t care what we get, so long as PHP treats as if it were an array.

Next, lets start coding the function itself. Inside of the curly braces, the first part looks like this:

// Unwrap the shortcode attributes, substituting the given defaults for any undefined attributes
$args = shortcode_atts(
    array(
        'url' => '',
        'width' => '960',
        'height' => '600',
    ),
    $atts
);

$url = esc_attr( $args['url'] );
$width = esc_attr( $args['width'] );
$height = esc_attr( $args['height'] );

What we do here is take the array of shortcode attributes that we passed in and unwrapping them from the array with WordPress’ built-in shortcode function. Then we specifically look for the ‘url,’ ‘width,’ and ‘height,’ attributes. If they are present, they are saved to a new $args array. If they aren’t present, then we instead put the appropriate default value in instead. Then we save the three attributes we care about in their own variables for ease of use and escape any special characters. We escape the characters to help protect us from ourselves: inadvertent SQL injection in our shortcode editor can wreak havok on our filesystem. It also allows us to have special characters in our url, if for whatever reason you want to.

The next part is some sanity checking to make sure we put in a url. Without a url, there won’t be much to do!

// validate the directory is not blank
if ( '' === trim ( $url ) ) {
    $message = __( 'Invalid WebGL location: No location given.' );
    _doing_it_wrong( __FUNCTION__, $message, '4.4.0' );
    return '</p>Invalid WebGL location: No location given.</p>';
}

This just adds a trailing slash if it doesn’t have one already. Pretty simple. Do note that I have ‘https’ in my url. If you don’t have your website using ‘https’, you will want to switch that to ‘http’.

$fullurl = trailingslashit(site_url('/unity/', 'https') . $url);

This section tells WordPress to load the UnityLoader file that Unity creates when you build a WebGL version of your game. This is the first step that references your game files.

// add the UnityLoader javascript file to footer
wp_enqueue_script('unity3d-loader', $fullurl . 'Build/UnityLoader.js', array(), null, true);

This adds the WebGL script to your page, and runs its instantiate method, which causes your game to start.

// add the WebGL.json javascript file to footer
wp_add_inline_script('unity3d-loader', 'var gameInstance = UnityLoader.instantiate("gameContainer", "../unity/' . $url . '/Build/WebGL.json");');

It still won’t show up on the page yet, though. For that, we need this line of code:

// returns the game window html code
return '<div id="gameContainer" style="width: ' . $width . 'px; height: ' . $height . 'px; margin: auto"></div>';

That is the last bit of the function, but your game still won’t show up. What gives?

Well, just like in C#, if you don’t tell WordPress that you actually want to run the function, it just sits there unused. So we need to add one more line of code to our custom-functions script, but this time outside of the function block:

add_shortcode('unity3d_embed_webgl', 'unity3d_embed_webgl_function');

That tells WordPress that you want your function to be loaded as a valid shortcode. When you’re all finished, the full custom-functions.php file should look like this:

<?php

function unity3d_embed_webgl_function( $atts = array() ) {

    // Unwrap the shortcode attributes, substituting the given defaults for any undefined attributes
    $args = shortcode_atts(
        array(
            'url' => '',
            'width' => '960',
            'height' => '600',
        ),
        $atts
    );

    $url = esc_attr( $args['url'] );
    $width = esc_attr( $args['width'] );
    $height = esc_attr( $args['height'] );


    // validate the directory is not blank
    if ( '' === trim ( $url ) ) {
        $message = __( 'Invalid WebGL location: No location given.' );
        _doing_it_wrong( __FUNCTION__, $message, '4.4.0' );
        return '</p>Invalid WebGL location: No location given.</p>';
    }

    $fullurl = trailingslashit(site_url('/unity/', 'https') . $url);

    // add the UnityLoader javascript file to footer
    wp_enqueue_script('unity3d-loader', $fullurl . 'Build/UnityLoader.js', array(), null, true);

    // add the WebGL.json javascript file to footer
    wp_add_inline_script('unity3d-loader', 'var gameInstance = UnityLoader.instantiate("gameContainer", "../unity/' . $url . '/Build/WebGL.json");');

    // returns the game window html code
    return '<div id="gameContainer" style="width: ' . $width . 'px; height: ' . $height . 'px; margin: auto"></div>';
}

add_shortcode('unity3d_embed_webgl', 'unity3d_embed_webgl_function');

?>

The Shortcode… Code

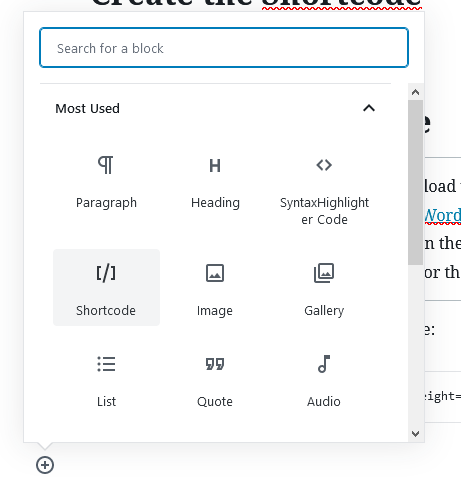
To add your game to your page now, you first upload your game to your webhost as described in Embed Unity3D Games in a WordPress Page. Then add a shortcode block to your page:

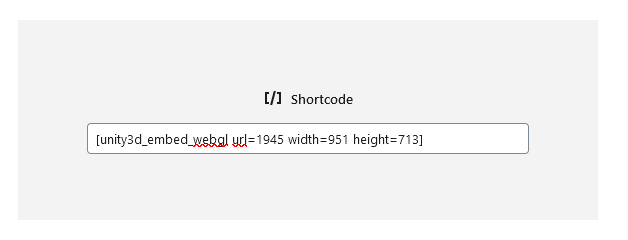
And finally fill in the textbox with your shortcode, giving your game’s information for the url, width, and height (the order shouldn’t matter, as long as you have the name of the shortcode first). This is a sample shortcode for my 1945 game, both in image and text format:

[unity3d_embed_webgl url=1945 width=951 height=713]

And voila! Your Unity game should appear on your website in the location on your page that you put your shortcode!

Server-Side High Scores in Unity3D

When developing my 1945 game, I wanted a way for the high score that one player achieved to be visible to another player playing my game on my website as well. Not knowing where to start, I wandered about the internet for a little while (as I am wont to do on occasion) and I happened across this post on the Unify wiki: Server Side Highscores.

Looking through the code on that page, I was sad to see that it is woefully out of date, as the “tested working solutions” it lists use the deprecated mysql_* PHP functions instead of mysqli_* or PDO. In addition, the code as presented was hard coded within the game to a very specific structure of GUI elements in Unity. So while it didn’t really work for my purpose, it at least got me thinking in the right direction.

Detailed here is my solution to server-side high scores. I’ve aimed for a solution that is at least a little bit more secure and (in my opinion) a little bit more elegant as its completely independent from the GUI.

Note that I’m not going to go in detail on how to add the high score system itself to your game, as that’s going to be dependent on a lot of things within your game. In my 1945 game I have a fairly simple system consisting of two arrays: an array of TextMeshProUGUI elements for the names and another with the scores that I display on screen when the game ends. Those just get populated with the data fetched by the code I will be detailing here. If you do want to see my full scoreboard code, my 1945 project is available for perusal on my Bitbucket.

Database

First, you will want to set up and create your database. There are a lot of resources online on how to set up a database and is entirely dependent on how you are going to show off your game, so I won’t rehash that here. I’m going to assume that you’re able to set up your database and access it somehow. My web host supplies access to database management through phpMyAdmin, but as long as you can execute SQL somehow you will be fine.

The important part here is to set up a table, and the Unify wiki has a reasonable setup for this, so I’ll just paraphrase the instructions and copy the SQL code to create the table directly from there:

Run the following SQL on your database. If you get a SQL Syntax error, replace

TYPE=MyISAM;

with

ENGINE=MyISAM; 

as TYPE is deprecated.

CREATE TABLE `scores` (
   `id` INT(10) UNSIGNED NOT NULL AUTO_INCREMENT PRIMARY KEY,
   `name` VARCHAR(15) NOT NULL DEFAULT 'anonymous',
   `score` INT(10) UNSIGNED NOT NULL DEFAULT '0'
)
TYPE=MyISAM;

Server-Side Scripts

Here we will create three scripts: one that will hold our mysqli connection information, one to save scores in the database, and one to retrieve them.

mysqli-connect-gamename.php

This file contains the connection information, including the password to log on to your database, in plaintext. Therefore this file should not be placed in your “public_html/” folder. Anything in your public_html folder can be read by anyone given enough interest to do so, so this is to help protect your database.

That is important, so let me repeat that. DON’T PUT THIS FILE ANYWHERE IN YOUR “PUBLIC_HTML/” DIRECTORY.

The other scripts assume they are at the root directory of your web hosting. If you put it somewhere elsewhere, you will have to adjust the

require ('../../../mysqli_connect-gamename.php');

line in the other two PHP files appropriately. Of course, replace the database information in the script below with your actual database information.

<?php # Script 9.2 - mysqli_connect-1945.php

// This file contains the database access information.
// This file also establishes a connection to MySQL,
// selects the database, and sets the encoding.

// Set the database access information as constants:
DEFINE ('DB_USER', 'database-username');
DEFINE ('DB_PASSWORD', 'database-password');
DEFINE ('DB_HOST', 'localhost');
DEFINE ('DB_NAME', 'database-name');

// Make the connection:
$dbc = mysqli_connect (DB_HOST, DB_USER, DB_PASSWORD, DB_NAME) OR die ('Could not connect to MySQL: ' . mysqli_connect_error() );

// Set the encoding...
mysqli_set_charset($dbc, 'utf8');

addscore.php

This script saves the score sent by your game to the database. Put this in the same folder as your game (so in my case, “unity/1945/”). Make sure the secret key here and the secret key in the C# script match exactly. While not necessary, I recommend generating a key using a password generator. There are a lot of free online options such as the Lastpass or 1Password password generators (generating a password on either of their sites is completely free to use, no login needed).

<?php

require ('../../../mysqli_connect-1945.php');
 
// Strings must be escaped to prevent SQL injection attack.
$name = mysqli_real_escape_string($dbc, $_GET['name']);
$score = mysqli_real_escape_string($dbc, $_GET['score']);
$hash = $_GET['hash'];

$secretKey="mySecretKey"; # Change this value to match the value stored in the client script

$real_hash = md5($name . $score . $secretKey);
if($real_hash == $hash) {
    // Send variables for the MySQL database class.
    $query = "INSERT INTO scores VALUES (NULL, '$name', '$score');";
    $result = $dbc->query($query) or die('Query failed: ' . mysqli_error($dbc));
}
?>

display.php

This script retrieves the scores from the database to be displayed in game. It returns a tab separated list of 10 name/score pairs, with each pair on its own line. That is, it returns a list that looks like this:

Matthew Randolph    1000
Matt    950
ThatMatGuy    800
Gurravanna Drillemont    700
TheMonthOfFebruary    600
Salazar Salamander    550
MrMatt    540
SomeGuyNamedMatt    500
JustAMattPassingBy    400
TheBestKindOfMatt    100

Note that because we are escaping characters when we save them to the database, even if someone decided to try to pull a fast one on us and include a TAB character in their name, we’d still be protected from it, as it should show up as an escaped sequence of characters that represents TAB and not as a TAB itself.

 <?php

 require ('../../../mysqli_connect-1945.php');

$query = "SELECT * FROM `scores` ORDER by `score` DESC LIMIT 10";
$result = mysqli_query($dbc, $query) or die('Query failed: ' . mysqli_error($dbc));

$num_results = mysqli_num_rows($result);

for($i = 0; $i < $num_results; $i++)
{
     $row = mysqli_fetch_array($result);
     echo $row['name'] . "\t" . $row['score'] . "\n";
}
?>

Client-Side Code (a.k.a Your Game)

ScoreboardWebInterface.cs

Here we create a C# script in your game that will connect to your addscore.php and display.php scripts to send and retrieve scores within the game. Start by creating a new C# script and calling it ScoreboardWebInterface.

Lets open the script and start by adding the variables we will need. We need a reference to the secret key you created in addscore.php, string references to your addscore and highscore php scripts, and a property to hold the scores:

public class ScoreboardWebInterface : MonoBehaviour
{
    private string secretKey = "YourSecretKey"; // Edit this value and make sure it's the same as the one stored on the server
    public string addScoreURL = "https://yourwebsite.com/unity/yourgame/addscore.php?"; // be sure to add a ? to your url
    public string highscoreURL = "https://yourwebsite.com/unity/yourgame/display.php";
    
    private KeyValuePair<string, string>[] scores;
    public KeyValuePair<string, string>[] Scores
    {
        get { return scores; }
    }

Next we write the method to send a new score to the database. Because we’re using web resources, we need to call it as a coroutine so that our game doesn’t lock up while we’re waiting around for the response from the server about whether it worked or not.

// Send the new score to the database
public IEnumerator PostScore(string name, int score)
{
    //This connects to a server side php script that will add the name and score to a MySQL DB.
    // Supply it with a string representing the players name and the players score.
    string hash = Utility.Md5Sum(name + score + secretKey);
 
    string post_url = addScoreURL + "name=" + WWW.EscapeURL(name) + "&score=" + score + "&hash=" + hash;
 
    // Post the URL to the site and create a download object to get the result.
    Debug.Log("Submitting score");
    WWW hs_post = new WWW(post_url);
    yield return hs_post; // Wait until the download is done
    Debug.Log("Score submitted");
 
    if (hs_post.error != null)
    {
        Debug.Log("There was an error posting the high score: " + hs_post.error);
    }
}

To fetch the scores from the database, we will use this next method.

// Get the scores from the database
public IEnumerator GetScores(Action<int> returnCode)
{
    scores = new KeyValuePair<string, string>[1];
    scores[0] = new KeyValuePair<string, string>("Loading Scores","");
        
    WWW hs_get = new WWW(highscoreURL);
    yield return hs_get;

    if (hs_get.error != null)
    {
        Debug.Log("There was an error getting the high score: " + hs_get.error);
        scores[0] = new KeyValuePair<string, string>("There was an error getting the high score", hs_get.error);
        returnCode(1);
    }
    else
    {
        // split the results into an array
        Regex regex = new Regex(@"[\t\n]");
        string[] rawScores = regex.Split(hs_get.text);

        // Restructure the string array into an array of KeyValuePairs
        scores = new KeyValuePair<string, string>[rawScores.Length / 2];
        int rawScoreIndex = 0;
        for (int i = 0; i < rawScores.Length / 2; i++)
        {
            scores[i] = new KeyValuePair<string, string>(rawScores[rawScoreIndex], rawScores[rawScoreIndex + 1]);
            rawScoreIndex += 2;
        }

        returnCode(0);
    }
}

This first fills the Scores property with the results from the database. Then, because as far as I know the return value of a Unity coroutine is consumed by the Unity engine itself, we need some other way of letting the rest of our code know the result of whether or not the GetScores function worked.

So we instead create an ‘out’ parameter of sorts with the Action<int> returnCode. You could make it more verbose by passing the result of an enum or something, but for my purposes I just wanted a pass-state (0) or a fail-state (1). Yes, I know it could be a boolean. Or a ReturnCode.Success/ReturnCode.Failure enum. And both of those would probably be better than the way I have it. Sometimes it can be hard to escape my time spent scripting with Unix. 😆

In case you want to check that you got all the code or you just want to copy the whole file, here is the entire ScoreboardWebInterface file in all its C# glory:

using System;
using UnityEngine;
using System.Collections;
using System.Collections.Generic;
using System.Text.RegularExpressions;

public class ScoreboardWebInterface : MonoBehaviour
{
    private string secretKey = "YourSecretKey"; // Edit this value and make sure it's the same as the one stored on the server
    public string addScoreURL = "https://yourwebsite.com/unity/yourgame/addscore.php?"; //be sure to add a ? to your url
    public string highscoreURL = "https://yourwebsite.com/unity/yourgame/display.php";
    
    private KeyValuePair<string, string>[] scores;
    public KeyValuePair<string, string>[] Scores
    {
        get { return scores; }
    }

    // Send the new score to the database
    public IEnumerator PostScores(string name, int score)
    {
        //This connects to a server side php script that will add the name and score to a MySQL DB.
        // Supply it with a string representing the players name and the players score.
        string hash = Utility.Md5Sum(name + score + secretKey);
 
        string post_url = addScoreURL + "name=" + WWW.EscapeURL(name) + "&score=" + score + "&hash=" + hash;
 
        // Post the URL to the site and create a download object to get the result.
        Debug.Log("Submitting score");
        WWW hs_post = new WWW(post_url);
        yield return hs_post; // Wait until the download is done
        Debug.Log("Score submitted");
 
        if (hs_post.error != null)
        {
            Debug.Log("There was an error posting the high score: " + hs_post.error);
        }
    }

    // Get the scores from the database
    public IEnumerator GetScores(Action<int> returnCode)
    {
        scores = new KeyValuePair<string, string>[1];
        scores[0] = new KeyValuePair<string, string>("Loading Scores","");
        
        WWW hs_get = new WWW(highscoreURL);
        yield return hs_get;

        if (hs_get.error != null)
        {
            Debug.Log("There was an error getting the high score: " + hs_get.error);
            scores[0] = new KeyValuePair<string, string>("There was an error getting the high score", hs_get.error);
            returnCode(1);
        }
        else
        {
            // split the results into an array
            Regex regex = new Regex(@"[\t\n]");
            string[] rawScores = regex.Split(hs_get.text);

            // Restructure the string array into an array of KeyValuePairs
            scores = new KeyValuePair<string, string>[rawScores.Length / 2];
            int rawScoreIndex = 0;
            for (int i = 0; i < rawScores.Length / 2; i++)
            {
                scores[i] = new KeyValuePair<string, string>(rawScores[rawScoreIndex], rawScores[rawScoreIndex + 1]);
                rawScoreIndex += 2;
            }

            returnCode(0);
        }
    }
 
}

Scoreboard.cs

So now that we have a database and a way to read and write values into and out of our program, how do we actually use the data? For fetching the scores from the database, you are going to want these two lines of code, which need to be wrapped in a coroutine due to the yield return statement:

// Fetch the global high score list from database
int returnCode = -1;
yield return scoreboardWebInterface.GetScores(status => returnCode = status);

And to save the scores is as simple as calling:

StartCoroutine(scoreboardWebInterface.PostScores(playerName, playerScore));

Since an example is worth 1,000 words (or something like that), this is how I use these in my 1945 game. I call LoadScores when the game starts so that I know that its ready (or failed) well before we need to use the scores.

private IEnumerator LoadScores()
{
    // This initializes the default scores from Scores.cs
    scores = new Scores();

    // Fetch the global high score list from database
    int returnCode = -1;
    yield return scoreboardWebInterface.GetScores(status => returnCode = status);

    if (returnCode == 0)
    {
        highScoreLocation = HighScoreLocation.Global;
        for (int i = 0; i < scoreboardWebInterface.Scores.Length; i++)
        {
            scores.names[i] = scoreboardWebInterface.Scores[i].Key;
            scores.scores[i] = Int32.Parse(scoreboardWebInterface.Scores[i].Value);
        }
    }
    else if (returnCode == 1)
    {
        // An error occurred attempting to get the high scores, so fall back to the local high score list
        highScoreLocation = HighScoreLocation.Local;
        saveStatePath = Path.Combine(Application.persistentDataPath, "scoreboard.sgm");

        // Read the high scores from the local JSON file, if it exists
        if (File.Exists(saveStatePath))
        {
            String fileContents = File.ReadAllText(saveStatePath);
            JsonUtility.FromJsonOverwrite(fileContents, scores);
        }
    }

    for (int i = 0; i < scores.scores.Length; i++)
    {
        scoreTexts[i].text = scores.scores[i].ToString();
    }
    for (int i = 0; i < scores.names.Length; i++)
    {
        nameTexts[i].text = scores.names[i].ToString();
    }
}

And I call CommitScores after the player has completed their run. Because I have multiple ways for the commit to happen, I have a sanity check in there to make sure that it doesn’t get double-committed:

public void CommitScores()
{
    if (!scoresSubmitted)
    {
        if (highScoreLocation == HighScoreLocation.Global)
        {
            if (playerName != null && playerScore != 0)
            {
                StartCoroutine(scoreboardWebInterface.PostScores(playerName, playerScore));
                scoresSubmitted = true;
            }
            else
            {
                Debug.Log("Score has not been saved, as either the name or score values are null.");
            }
        }
        else if (highScoreLocation == HighScoreLocation.Local)
        {
            File.WriteAllText(saveStatePath, JsonUtility.ToJson(scores, true));
            scoresSubmitted = true;
        }
        else
        {
            Debug.Log("The high score location is undefined.");
        }
    }
}

And voila! You should now have the structures required to implement your own server-side high score table similar to the one I have in 1945:

Debugging Tips

The Debug.Log() command in Unity is a powerful tool for debugging problems. When you’re running a WebGL build, any Debug.Log() lines you include in your unity project will appear in the browser console, along with any other errors or warnings that occur. This is a super handy way to identify and fix problems that crop up while trying to set up your code on a website!

In Firefox, you can open the console by pressing Ctrl-Shift-K, in Internet Explorer and Edge by pressing F12, and in Chrome by pressing Ctrl-Shift-J. If you’re using a different browser, sorry, I’m not familiar with how to find your browser’s console. You’ll have to do a web search to figure it out!

You also have to be especially careful that you enter the URL’s exactly. If you type “http://” instead of “https://” or if you don’t include the “www.” in front of it when you need it, you will get an error in the console like “Cross-Origin Request Blocked: The Same Origin Policy disallows reading the remote resource at $somesite” indicating that the request was blocked due to violating the CORS security rules.

While there could be other reasons why CORS blocks your request, the reasons I noticed were when I tried to go across from https:// to http:// or when I used an IFrame to embed my game in WordPress. IFrame has some weirdness with accessing external resources, even from the same site. If you want to publish this game on a WordPress site, you will likely want to look at my Embedding Unity Games with Shortcodes page.

Setting Up Google CourseBuilder in the PyCharm IDE on Windows

This is a direct follow-up to my last post, Setting Up Google CourseBuilder in the PyCharm IDE on Mac OS X.

There wasn’t a single source of information I could find to get CourseBuilder to work properly, so I decided to put together this guide in the chance that I need to go through the process again. I make no guarantee nor responsibility that it will work for anyone else. All I know is that it worked for me in my particular situation.

Step 1: Download ALL THE PROGRAMS!

CourseBuilder is based off of Python, so check to make sure Python is installed. CourseBuilder doesn’t play nice with version 3, so make sure you have a version of Python 2. I have Python 2.7.10. You can download it here.

PyCharm, my Python IDE of choice (since the others on my project are using it), can be found here.  Grab the Community Version 4.0.6. For some reason, PyCharm 4.5 doesn’t play nice with CourseBuilder.

To run CourseBuilder, you need to have the Google App Engine SDK. The Engine runs as the server of CourseBuilder. If I understand correctly, it would then be impossible to run without it. Download that here. Grab the “for Python” version.

Finally, download Google CourseBuilder here. I was having issues directly clicking “Export to GitHub,” so click on the Downloads page and download the latest zip version. At the time of writing, it was “Course Builder v1.8.0 (6 April 2015).” Check to make sure your copy has a “lib” folder. One time I downloaded it, there must’ve been a problem since it didn’t download the entire program.

Not necessarily required, but I ended up needing a basic text editor for one step. I recommend Notepad++, which you can download here.

After downloading, install the files that ask to be installed. Which should be all of them except CourseBuilder. Now time to make everything play nice together! This was far easier than it was on my Mac.

Step 2: Follow the Directions!

Here, I just followed the directions on this website. In case something happens to it, though, I’ll re-post it here.

Configure python GAE debugging

This is the minimum Run/Debug configuration that will enable you to debug your python for GAE application. It must be set on a per project basis. You’ll need a pre-existing GAE project for this to work. The prerequisites at the end of this post explain how to set up an example GAE application.

    1. Open the GAE project in PyCharm:
      1. Select menu item File > Open…
      2. Select your base project folder (the one which contains an app.yaml file). For our examples we’ll be using the folder C:myproject, which we’ll refer to as <myproject_path>.
    2. Add a new python configuration:
      1. Run > Edit Configurations…
      2. Click the green plus sign “+
      3. In the Add New Configuration list, select Python.
      4. Specify the configuration parameters:
        1. Name: GAE_config
          Choose a name, which we’ll refer to as GAE_config
        2. Script: <GAE_install_path>dev_appserver.py
          Here you need to enter the location of the dev_appserver.py file installed in your Google App Engine SDK. On Windows the default installation is C:Program Files (x86)Googlegoogle_appenginedev_appserver.py. We’ll refer to this location as <GAE_install_path>
        3. Script parameters:
          –automatic_restart=no –max_module_instances=”default:1″ .
          These are the minimum arguments needed for the debugging to work.
          Ensure you include the final argument, “.“: it means the current path, i.e. the working directory in this case.
        4. Working directory: <myproject_path>
        5. Tick the Share box.
          This creates configuration file <myproject_path>.idearunConfigurationsGAE_config.xml, which can be shared with other users and put in version control.
        6. Press OK

PyCharm python run/debug configuration for Google App Engine

  1. Check the python debugger settings:
    1. File > Settings…
    2. Expand the tree to Build, Execution, Deployment > Python Debugger
    3. Ensure the option Attach to subprocess automatically while debugging is ticked.

The basic PyCharm configuration for python GAE debugging is done. To debug, add a breakpoint in the python file and run in debug mode.

Enable code navigation for GAE libraries

To enable PyCharm’s code navigation and completion, we need to add the GAE SDK to PyCharm’s list of External Libraries.

  1. Close PyCharm
  2. Create a GAE SDK library file:
    1. In <myproject_path>.idea, create a directory named libraries.
    2. In <myproject_path>.idealibraries, create an xml file named GAE_SDK.xml
    3. Copy and paste the xml code below in GAE_SDK.xml:
      <component name="libraryTable">
        <library name="GAE_SDK" type="python">
      	<CLASSES>
      	  <root url="file://C:/Program Files (x86)/Google/google_appengine" />
      	  <root url="file://C:/Program Files (x86)/Google/google_appengine/lib/django-1.5" />
      	  <root url="file://C:/Program Files (x86)/Google/google_appengine/lib/jinja2-2.6" />
      	  <root url="file://C:/Program Files (x86)/Google/google_appengine/lib/webapp2-2.5.2" />
      	</CLASSES>
      	<SOURCES />
        </library>
      </component>
      
    4. Update the paths C:/Program Files (x86)/Google/google_appengine as needed to point to your GAE install location. See the next section if you’d like to use a per user macro path variable instead. To add more GAE libraries, add them to the list (in a similar way to webapp2, django and jinja). Save.
  3. Update the project’s .iml file with the GAE SDK reference:
    1. Open <myproject_path>.ideamyproject.iml
    2. Add the line below to the component element and save.
      	<orderEntry type="library" name="GAE_SDK" level="project" />
  4. Open PyCharm. GAE_SDK should be listed under the External Libraries in the Project viewer (View > Tool Windows > Project). In the python code, you can open class definitions (right-click on class) and code completion works.

After this, I set it up to push directly to my GitHub repository. To do so:

  1. VCS > Import into Version Control > GitHub
  2. Give PyCharm your username and password
  3. Add a master password if you have one, otherwise leave it blank
  4. Select a name for you repository (probably coursebuilder)
  5. Use VCS > Commit Changes to push modifications to your repository.

At this point, I had a “no module named lxml.html” error, the very same as when I tried with my Mac.

To fix this, I used PyCharm’s built-in library manager. And it worked this time!

  1. File > Settings…
  2. Expand Project: coursebuilder > Project Interpreter
  3. Click the green plus sign “+
  4. Typed “lxml” in the search bar and highlighted lxml in the menu
  5. Clicked Install Packages.

The library downloaded, installed, and then the program ran! How’s that for easy?

Setting Up Google CourseBuilder in the PyCharm IDE on Mac OS X

There wasn’t a single source of information I could find to get CourseBuilder to work properly, so I decided to put together this guide in the chance that I need to go through the process again. I make no guarantee nor responsibility that it will work for anyone else. All I know is that it worked for me in my particular situation.

Step 1: Download ALL THE PROGRAMS!

CourseBuilder is based off of Python, so check to make sure Python is installed. CourseBuilder doesn’t play nice with version 3, so make sure you have a version of Python 2. By default, it should be included on Mac. I have version 2.7. Perfect!

PyCharm, my Python IDE of choice (since the others on my project are using it), can be found here.  Grab the Community Version 4.0.6. For some reason, PyCharm 4.5 doesn’t play nice with CourseBuilder.

To run CourseBuilder, you need to have the Google App Engine SDK. The Engine runs as the server of CourseBuilder. If I understand correctly, it would then be impossible to run without it. Download that here. Grab the “for Python” version.

Finally, download Google CourseBuilder here. I was having issues directly clicking “Export to GitHub,” so click on the Downloads page and download the latest zip version. At the time of writing, it was “Course Builder v1.8.0 (6 April 2015).” Check to make sure your copy has a “lib” folder. One time I downloaded it, there must’ve been a problem since it didn’t download the entire program.

Not necessarily required, but I ended up needing a basic text editor for one step. I recommend TextWrangler, which you can download here.

After downloading, move the applications that ask to be moved to your Applications folder. Apple sure makes installs easy. Now time to make everything play nice together!

Step 2: Set Up Run/Debugging in PyCharm

I used a lot of information from this website to figure this step out. It was written for Windows though, so I had to change a few things.

The first thing you’ll notice after you open PyCharm is a dialogue box that says “Do you want the application “PyCharm CE.app” to accept incoming network connections?” I believe you have to select yes for it to be able to work properly with Version Control, the updater, or some other programs.

Now to set up run/debugging:

  1. Open the GAE project in PyCharm:
    1. Select menu item File > Open…
    2. Select your base project folder (the one which contains an app.yaml file). For these examples I’ll refer to it as <myproject_path>.
  1. Add a new python configuration:
    1. Run > Edit Configurations…
    2. Click the green plus sign “+
    3. In the Add New Configuration list, select Python.
    4. Specify the configuration parameters:
      1. Name: GAE_config
        Choose a name, which we’ll refer to as GAE_config
      2. Script: <GAE_install_path>dev_appserver.py
        Here you need to enter the location of the dev_appserver.py file installed in your Google App Engine SDK. On Mac OS X the default installation is /Applications/GoogleAppEngineLauncher.app/Contents/Resources/GoogleAppEngine-default.bundle/Contents/Resources/google_appengine/dev_appserver.py. We’ll refer to this location as <GAE_install_path>
      3. Script parameters:
        –automatic_restart=no –max_module_instances=”default:1″ .
        These are the minimum arguments needed for the debugging to work. Don’t ask, I don’t know why.
        Ensure you include the final argument, “
        .“: it means the current path, i.e. the working directory in this case.
      4. Working directory: <myproject_path>
      5. Tick the Share box.
        This creates configuration file <myproject_path>.idearunConfigurationsGAE_config.xml, which can be shared with other users and put in version control.
      6. Press OKgae-mac-preferences
  1. Check the python debugger settings:
    1. PyCharm > Preferences…
    2. Expand the tree to Build, Execution, Deployment > Python Debugger
    3. Ensure the option Attach to subprocess automatically while debugging is ticked.

At this point, the basic PyCharm configuration for python GAE debugging is done. To debug, add a breakpoint in the python file and run in debug mode. However, I had a few problems when I tried to run it.

First, I got an error that said lxml was missing.

Lxml is a library of some sort. PyCharm actually has a robust library import system built directly into it. To find it:

    1. PyCharm > Preferences…
    2. Expand the tree to Project:coursebuilder > Project Interpreter
    3. Check to see if lxml is included in the list of libraries.

In my case, it was missing, so I tried to add it to the libraries.

    1. Click the little “+” in the lower-left corner
    2. Type “lxml” in the search bar, and select it
    3. Click Install Packages.

I get a “pip could not be found” error. Great.

Pip is the Python library downloader. Apparently, it’s not included in Python 2.7 by default, so open up a Terminal and put the following command in:

sudo easy_install pip

It will then ask for your password, and install pip for you!

Trying the above method to install lxml, I received another error, and the only way I could figure out to install lxml was to use a workaround, utilizing xcode—the Apple development suite. I don’t know if it will work without xcode explicitly being installed on your machine or not.

sudo CPATH=/Applications/Xcode.app/Contents/Developer/Platforms/MacOSX.platform/Developer/SDKs/MacOSX10.9.sdk/usr/include/libxml2 CFLAGS=-Qunused-arguments CPPFLAGS=-Qunused-arguments pip install lxml

Now my CourseBuilder website runs correctly! Press the green play button to run the server. To see your website, you click one of the three links will appear in the terminal. By default, it runs on port 8080.

Setting up auto complete, on the other hand, is another project for another day.